| Prev | Next |
Decision Table
A Decision Table is a tabular representation of a set of related input and output expressions, organized into rules indicating which output entry applies to a specific set of input entries.
Decision Tables are supported by both the Decision and the Business Knowledge Model element types. They are denoted by the ![]() icon.
icon.
Access
|
Diagram |
On a diagram, double-click on a Decision element or BusinessKnowledgeModel element. The DMN Expression editor window is displayed, showing details of the selected element. |
Overview
This image shows the DMN Expression editor window as it appears for a Decision Table.
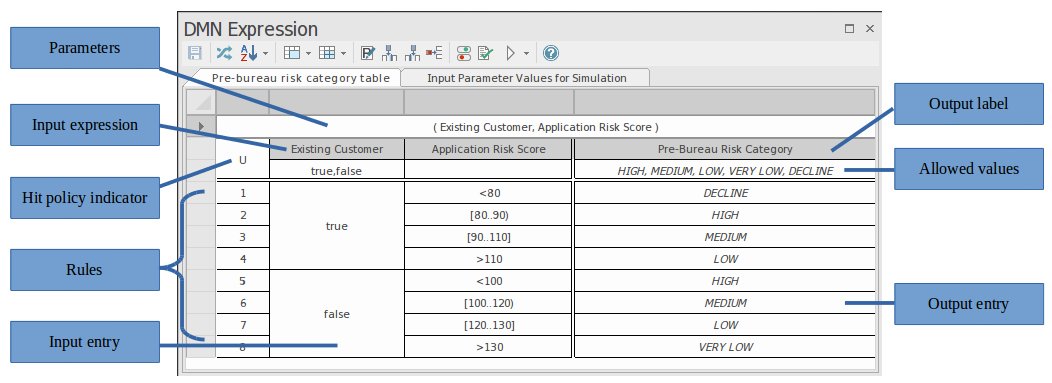
A decision table consists of:
- A list of rules, where each rule contains specific input entries and corresponding output entries
- A list of input clauses, defined as expressions that generally involve one or more input values
- A list of output clauses, defining the output corresponding to a specific set of inputs
- The table hit policy that specifies how the rules are applied.
An input clause consists of an expression and an optional list of allowed values. Very often, the expression is simply an unmodified input value, however, it could also be an expression involving more than one input value or perhaps a conditional statement such as 'Application Risk Score > 100'. The allowable values apply to the expression result rather than the input values used.
Each output clause consists of an identifier (a name) and again an optional list of allowed values for that clause.
The table itself consists of a list of numbered rules, defining a set of input entries and corresponding output entries.
The decision table should contain all (and only) the inputs required to determine an output.
In determining which rules are applied, the expressions defined in the input clauses are evaluated for the given inputs and the expression results are then used to find rules with matching input entries.
Toolbar for Decision Table Editor
When a Decision Table is selected, the layout of features accessible in the DMN Expression window is as shown:

For more details refer to the Help topic 'Toolbar for Decision Table Editor'.
Parameters
In the case of BusinessKnowledgeModel elements, parameters are used to pass input values supplied by the invoking element. The BKM's decision logic is evaluated using the input parameters and the result is returned to the invoking element. By default, a BKM element is created with two input parameters, 'Input 1' and 'Input 2'.
Click on the  icon in the toolbar of the DMN Expression editor window to display the 'Edit Parameters' window.
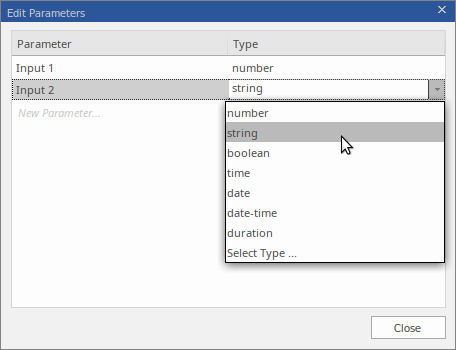
Here you can change the parameter names, set their data types, create additional parameters or delete existing ones.
Hit Policy
Right-click on the 'Hit Policy Indicator', then choose the desired hit policy from the pop-up menu. The various table hit policies are described in detail in the Help topic Decision Table Hit Policy.
Input Clauses
An input clause of a Decision Table is defined as an expression. Very often, the expression is simply an unmodified input value; however, it could also be an expression involving more than one input value or could be defined as a conditional statement, such as 'Application Risk Score > 100'. The allowable values apply to the expression result rather than the input values used and, as such, the type of the values should match the type of the expression result.
Decision Tables are created with two default input clauses, 'Input 1' and 'Input 2'. The data type for both of these clauses is 'number'. In the expression editor, the input clauses are displayed as column headings on the Decision Table. To modify an input clause, click on the column heading to select the cell, then click again or press to edit.
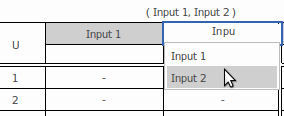
Auto-completion is supported when editing input clauses. That means, for Decision elements, any inputs that are connected to the decision element are made available for selection from a list. Similarly, for BKM elements, the invocation parameters are made available for selection from a list. See the Help topic Auto-completion for further information.
To add additional columns of input entries to the Decision Table, click on the  icon on the toolbar of the Expression editor window.
To remove input columns from the table, right-click within the unwanted input column, then select the option 'Delete Input Column' from the pop-up menu.
The order of the columns in the table can be re-arranged by dragging and dropping columns to new positions. (Drag the unlabelled cell at the very top of the table column to the required position.)
Allowed Values
When defining an Input or an Output column, the second row of this column defines the Allowed Values. This is an optional cell in the column, but useful for clarifying the entries in the rows below this. When running a validation, each of the cells below this are checked that they conform to the expression in this cell.
The expressions used in this cell depends on the how the 'Input' or 'Output' column is typed. For example:
- number - [18 ..35]
- string - 'High', 'Low', 'Medium'
- boolean - true, false
Fast Fill Allowed Values
The Input/Output Expression that this references can be a simple value or a complex FEEL expression; however if it is directly related to an ItemDefinition's 'Allowed Values' field then pressing the Spacebar will enable a fast-fill option to set the 'Allowed Values' as defined in the ItemDefinition (usually referenced via an InputData element) .
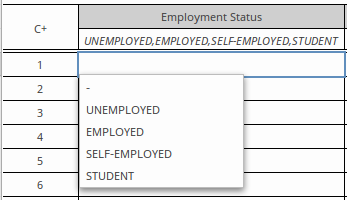
Fast Fill Rows
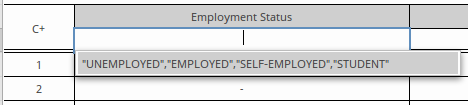
Once the 'Allowed Values' field is defined, as well as restricting the values that can be used when defining the rules in the table, the 'Allowed Values' field also provides the user with a fast fill option. This is invoked, in a rule cell, by pressing the Spacebar and selecting the required item:
For more details see the Help topic DMN Expression Auto Completion.
Output Clauses
An output clause consists of a name, a data type and an optional list of allowed values. To modify an output clause, click on the column heading cell to select the cell, then click again or press to edit.
To add additional columns of output entries to the decision table, click on the  icon on the toolbar of the Expression editor window.
To remove output columns from the table, right-click within the unwanted output column, then select the option 'Delete Output Column' from the pop-up menu.
The order of the columns in the table can be re-arranged by dragging and dropping columns to new positions. (Drag the unlabelled cell at the very top of the table column to the desired position.)
Data Type for Input/Output Clauses
For the simulation to work It is critical to set the data type for all input and output clauses. Range, gap and overlap validations are supported for clauses of type 'number', but validation cannot be performed if the type has not been specified. Code Generation for typed languages such as C++, C# and Java requires that the data types are specified. When the data type is specified as 'string', there is no need to enclose each string literal within quotes. String values are displayed using italic font if the type has been declared.
To set the data type, right-click on the Input Clause or Output Clause and select the required type from the list.

Defining Decision Table Rules
Decision Table rules are defined by specifying input entries and corresponding output entries within the cells of a table row. For 'number' data types, input entries can be specified as a single value, or as a number range, such as '<10', '>100' or '(2..8]'. (When defining number ranges, the use of round brackets indicate that the bounding number is NOT included, use of square brackets indicates the bounding number is included.) Output entries should specify a single value per cell.
Additional rules can be appended to the list of rules by clicking on the  icon in the toolbar. Unwanted rules can be deleted from the table by right-clicking on the rule and selecting the option 'Delete Rule Row' from the pop-up menu.
Existing rules can be copied and pasted within the table by first selecting the rules, (use 'Ctrl+Click' to add/remove from selection), then using the menu options 'Copy Rules to Clipboard' and 'Paste Rules from Clipboard' to perform the copy and paste. The copied rules can then be modified by selecting and editing individual cell entries.
If the 'Allowed Values' field is set for a string or boolean expression, the can be used for selecting a value from the list of allowed values.
Rules can also be sorted within the table, either by:
- Clicking the
 icon on the toolbar, then choosing to either 'Sort By Input' or 'Sort By Output', or
 - Right-clicking on individual rules within the table and selecting the 'Move Rule Up' or 'Move Rule Down' option from the pop-up menu
To determine which table rows are selected for output, the expressions that are defined by the input clauses are evaluated for the given inputs and the results of the expressions are then compared against the input entries of the table rows. Where the expression results match the input entries of a table row, that row is selected for output.
The Decision Table's 'Hit Policy' determines how the table's matching rows are then used to produce its output.